
Step 1: Download the Reflection App on the computer that is connected to your projector. You can find the app here: http://reflectionapp.com. There is a one-time cost of $14.99 for one license or $49.99 for five licenses. This may seem like a lot of money, but I believe it was worth the investment. You will notice that this program can also be used to project your iPhone!
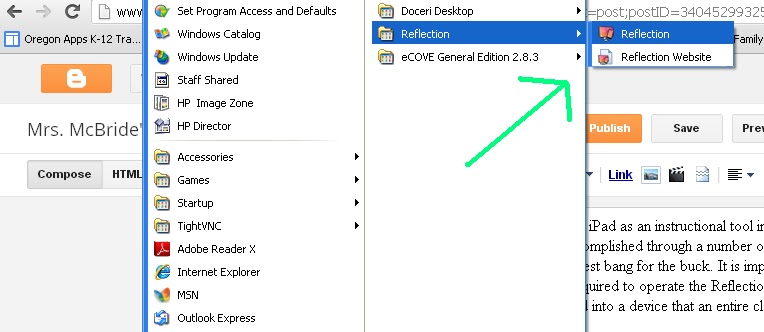
Step 2: Once the program has been installed, open it. You should be able to find the program under your Start menu - All Programs - Reflection. It may not look like the program is open, but it is!

Step 4: Tap the Airplay icon on the bottom of the screen and it will display a list of available devices to mirror with. It is important that you select YOUR computer from this list. Otherwise, your iPad will be projected on another teacher's computer! After selecting your computer, slide the Mirroring button to ON. Then, your iPad screen should appear on your desktop!

If you want to minimize the program, you can hit the escape button on your desktop keyboard and minimize the program until you want to use it again. Finally, when you are finished using the Reflection App, right click on the screen of your desktop. This will bring up a menu. Click "Close Connection." This menu can also be used to change how the iPad screen is displayed. Play around with the different formats until you find the one that best suits your needs!
Possible Disadvantages: Using the Reflection App, you can display many of the apps on your iPad and engage students in whole group activities using the iPad. The app is not perfect though, and depending on your connection speed, there may be some delay when displaying an app with a lot of graphics. On that same note, if your network is down, this app will not work. In addition, Reflection App is only compatible with iPad2 or newer devices.
Password Protection: You can set a password on your computer to prevent other individuals from displaying their device on your desktop. Keep in mind that this will also mean that you will be required to enter the password to run the program! To set a password, find the Reflection icon on your toolbar on the bottom right of your desktop computer. It looks like this:

Right-click over the top of the Reflection App icon and select Preferences. This will bring up a window that will allow you to enter a password. I suggest making the password easy so you can type it in quickly when mirroring your iPad with your device.
One of my favorite uses for this app in addition to the obvious benefit of engaging students in app activities is to take photos with the Camera. It is an instant way to display student work or projects for everyone to see! There are so many possibilities with this feature!
Please let me know if you have any questions or need assistance with the Reflection App!

No comments:
Post a Comment